Using Ring 1T with Claude Code via ZenMux
What is Ring 1T?
Ring 1T is a powerful open-source reasoning model designed for complex problem-solving and advanced coding tasks. It’s built on the Ling 2.0 architecture with impressive capabilities:
- Scale: 1 trillion total parameters with 50 billion activated parameters
- Context: Supports up to 128K tokens context window
- Training: Enhanced through large-scale verifiable reward reinforcement learning (RLVR)
- Strengths: Excels at deep reasoning, natural language inference, and sophisticated code generation
Ring 1T represents the latest advancement in MoE (Mixture of Experts) architecture scaling, leveraging the icepop reinforcement learning stabilization method and the ASystem framework to deliver exceptional reasoning performance.
Open Source: Download model weights from Hugging Face , ModelScope , and ZenMux .
What is ZenMux?
ZenMux is an enterprise-grade AI model aggregation platform that provides unified access to leading language models worldwide. Key features include:
- Unified API: Access models from OpenAI, Anthropic, Google, DeepSeek, and more through a single interface
- Intelligent Routing: Automatically select optimal models based on your needs
- High Availability: Built-in failover mechanisms ensure reliability
- Quality Assurance: AI model insurance services (coming soon) to address concerns about hallucinations and output instability
With ZenMux, developers can seamlessly integrate multiple AI models without managing different APIs or endpoints.
What is Claude Code?
Claude Code is Anthropic’s official AI coding agent that helps you write, debug, and understand code directly from your terminal or VSCode. It combines:
- Natural conversation: Interact with AI using natural language
- Code awareness: Understands your project structure and context
- Direct execution: Reads files, makes edits, and runs commands
- Flexibility: Works as both a CLI tool and VSCode extension
Claude Code is designed to be your AI pair programmer, handling everything from simple code questions to complex multi-file refactoring.
Why Ring 1T with Claude Code via ZenMux?
Combining these three tools gives you:
- Ring 1T’s advanced reasoning for complex coding challenges
- Claude Code’s intuitive interface for seamless interaction
- ZenMux’s unified platform for easy model access and management
This guide walks you through configuring Claude Code to use Ring 1T through ZenMux—it takes just a few environment variables. The key setting is: ANTHROPIC_BASE_URL="https://zenmux.ai/api/anthropic"
Getting Started: Installation & Configuration
Step 1: Install Claude Code
Important Update: npm/pnpm Installation Is Deprecated
The npm/pnpm installation method for Claude Code has been deprecated. If you previously installed via npm/pnpm, first uninstall the old version:
npm uninstall -g @anthropic-ai/claude-code
# or
pnpm uninstall -g @anthropic-ai/claude-code
Then use the new native installation method.
Recommended: Native Installation
macOS/Linux/WSL:
curl -fsSL https://claude.ai/install.sh | bashWindows PowerShell:
irm https://claude.ai/install.ps1 | iexWindows CMD:
curl -fsSL https://claude.ai/install.cmd -o install.cmd && install.cmd && del install.cmdPackage Managers (manual updates required):
Homebrew (macOS):
brew install --cask claude-codeWinGet (Windows):
winget install Anthropic.ClaudeCodeInstallation Notes
- Native installers auto-update automatically
- Package manager installs require manual updates via
brew upgrade claude-codeorwinget upgrade Anthropic.ClaudeCode - After installation, verify with:
claude doctor - For full details, see Claude Code installation docs
Configure Claude Code
How the Configuration Works
By default, Claude Code connects to Anthropic’s service. To use Ring 1T, we redirect requests to ZenMux using environment variables. This approach:
- Requires no changes to Claude Code: Just set environment variables
- Uses your ZenMux API Key: Simple authentication
- Enables Ring 1T access: Use the powerful reasoning model in Claude Code
The setup involves two key environment variables: ANTHROPIC_BASE_URL (ZenMux endpoint) and ANTHROPIC_AUTH_TOKEN (your ZenMux API Key). This routes all Claude Code requests through ZenMux to Ring 1T.
Important Change in v2.0.7x
Due to updates in Claude Code v2.0.7x, its environment-variable loading logic has changed: the
envconfig in~/.claude/settings.jsoncannot be reliably read in the following scenarios:
- When logging in for the first time in Claude Code
- When logging in again after running logout
Therefore, when connecting to ZenMux, it’s recommended to standardize on shell profile environment variables to ensure both login and requests go through ZenMux’s Anthropic-compatible endpoint.
Step 2: Get a ZenMux API Key
Before configuring Claude Code, obtain a ZenMux API Key. ZenMux offers two billing options:
Best for: Personal development, learning/exploration, Vibe Coding
Features: Fixed monthly fee, predictable cost, 5–10x price advantage
API Key format: `sk-ss-v1-xxx`

Getting started:
1. Visit the [subscription management page](https://zenmux.ai/platform/subscription)
2. Choose a plan (Pro $20/mo, Max $100/mo, Ultra $200/mo)
3. Create a subscription API Key after subscribing

For more details, see the [Subscription Plan Guide](https://docs.zenmux.ai/guide/subscription)
Best for: Production, commercial products, enterprise applications
Features: No rate limits, production-grade stability, pay-per-use billing
API Key format: `sk-ai-v1-xxx`
Getting started:
1. Visit the [pay-as-you-go page](https://zenmux.ai/platform/pay-as-you-go)
2. Top up your account (includes 20% bonus credit automatically)
3. Create an API Key in the "Pay-as-you-go API Keys" section
For more details, see the [Pay-as-you-go Guide](https://docs.zenmux.ai/guide/pay-as-you-go)Important: Choose the Right API Key Type
- For personal development or learning → Use a Subscription API Key (
sk-ss-v1-xxx) for better value and lower cost- For production or commercial projects → Use a Pay-as-you-go API Key (
sk-ai-v1-xxx) for higher stability and no limitsNote: Subscription keys are not allowed for production use. Using them incorrectly may result in account restrictions.
Step 3: Configure Claude Code
How the Configuration Works
By default, Claude Code connects to Anthropic’s official service. To use Ring 1T via ZenMux, redirect requests using environment variables:
- No changes needed to Claude Code itself — just set two environment variables
- Simple authentication — use your ZenMux API Key
- Transparent redirection — all requests route through ZenMux to Ring 1T
The configuration uses two key variables:
ANTHROPIC_BASE_URL— points to ZenMux’s Anthropic-compatible endpointANTHROPIC_AUTH_TOKEN— your ZenMux API Key for authentication
Important: Claude Code v2.0.7x Environment Variable Loading
In Claude Code v2.0.7x and later, environment variables in
~/.claude/settings.jsoncannot be reliably loaded during:
- First-time login
- Login after running
logoutRecommendation: Use shell profile environment variables (as shown below) to ensure consistent availability during both login and API requests through ZenMux.
Option 1: Shell Profile Configuration (Recommended)
# 1. Determine which shell you are using (usually bash or zsh):
#    - If using bash, edit ~/.bashrc
#    - If using zsh, edit ~/.zshrc
#    - If you're not sure, run echo $SHELL

# 2. Append the following to the end of the corresponding config file (replace the API Key)

# ============= ZenMux + Claude Code Configuration =============
# Connect Claude Code to ZenMux instead of Anthropic’s official service

# Core settings: ZenMux endpoint and authentication
export ANTHROPIC_BASE_URL="https://zenmux.ai/api/anthropic"  # ZenMux Anthropic-compatible endpoint
export ANTHROPIC_AUTH_TOKEN="sk-ss-v1-xxx"                   # Replace with your ZenMux API Key (subscription sk-ss-v1-xxx or pay-as-you-go sk-ai-v1-xxx)
export CLAUDE_CODE_DISABLE_NONESSENTIAL_TRAFFIC="1"          # Disable non-essential traffic
export API_TIMEOUT_MS="30000000"                              # API timeout in milliseconds

# Avoid conflicts: if you previously set ANTHROPIC_API_KEY locally, explicitly clear it
export ANTHROPIC_API_KEY=""

# Model configuration: Set Ring 1T as your default model
# Ring 1T excels at reasoning and complex coding tasks
export ANTHROPIC_DEFAULT_HAIKU_MODEL="inclusionai/ring-1t"   # Fast tier
export ANTHROPIC_DEFAULT_SONNET_MODEL="inclusionai/ring-1t" # Balanced tier (recommended)
export ANTHROPIC_DEFAULT_OPUS_MODEL="inclusionai/ring-1t"     # Most capable tier

# 3. Apply the configuration (choose one):
# Option 1: Reload the config file (recommended)
source ~/.bashrc  # if using bash
# or
source ~/.zshrc   # if using zsh

# Option 2: Restart the terminal window
On Windows, the process is similar but uses PowerShell and the PowerShell Profile:
# ============== Steps ==============

# On Windows, use the PowerShell Profile to configure environment variables
# PowerShell 7+ is recommended for a better experience

# 1. Check whether the PowerShell Profile exists
Test-Path $PROFILE

# 2. If it returns False, create the Profile file
if (!(Test-Path $PROFILE)) {
    New-Item -Path $PROFILE -ItemType File -Force
}

# 3. Open the Profile file for editing
notepad $PROFILE
# If you use VSCode, you can also run: code $PROFILE

# 4. Append the following to the end of the Profile file (replace the API Key)

# ============= ZenMux + Claude Code Configuration =============
# Connect Claude Code to ZenMux instead of Anthropic’s official service

# Core settings: ZenMux endpoint and authentication
$env:ANTHROPIC_BASE_URL = "https://zenmux.ai/api/anthropic"  # ZenMux Anthropic-compatible endpoint
$env:ANTHROPIC_AUTH_TOKEN = "sk-ss-v1-xxx"                   # Replace with your ZenMux API Key (subscription sk-ss-v1-xxx or pay-as-you-go sk-ai-v1-xxx)
$env:CLAUDE_CODE_DISABLE_NONESSENTIAL_TRAFFIC = "1"          # Disable non-essential traffic
$env:API_TIMEOUT_MS = "30000000"                              # API timeout in milliseconds

# Avoid conflicts: if you previously set ANTHROPIC_API_KEY locally, explicitly clear it
$env:ANTHROPIC_API_KEY = ""


# Model configuration: Set Ring 1T as your default model
# Ring 1T excels at reasoning and complex coding tasks
# https://zenmux.ai/inclusionAI/ring-1t
$env:ANTHROPIC_DEFAULT_HAIKU_MODEL = "inclusionai/ring-1t"   # Fast tier
$env:ANTHROPIC_DEFAULT_SONNET_MODEL = "inclusionai/ring-1t" # Balanced tier (recommended)
$env:ANTHROPIC_DEFAULT_OPUS_MODEL = "inclusionai/ring-1t"     # Most capable tier

# 5. Save the file, then restart PowerShell to apply
# Or run this in the current window: . $PROFILE

# 6. Verify the environment variables were set successfully
Write-Host "ANTHROPIC_BASE_URL: $env:ANTHROPIC_BASE_URL"
Write-Host "ANTHROPIC_AUTH_TOKEN: $env:ANTHROPIC_AUTH_TOKEN"
Important: Replace the API Key
Be sure to replace
sk-ss-v1-xxxorsk-ai-v1-xxxin the configuration with your real ZenMux API Key:Subscription API Key (recommended for personal development)
- Format:
sk-ss-v1-xxx- Get it from: Subscription management page
- Detailed guide: Subscription plan docs
Pay-as-you-go API Key (production)
- Format:
sk-ai-v1-xxx- Get it from: Pay-as-you-go page
- Detailed guide: Pay-as-you-go docs
Environment Variable Reference
| Variable | Purpose | Notes |
|---|---|---|
ANTHROPIC_BASE_URL | Service endpoint | Redirects Claude Code requests to ZenMux |
ANTHROPIC_AUTH_TOKEN | Auth token | Your ZenMux API Key (subscription or pay-as-you-go) |
Step 4: Launch Claude Code
Open a new terminal window to load the environment variables, then start Claude Code:
-
Go to your project directory:
cd /path/to/your/project -
Start Claude Code:
claude -
On first launch, Claude Code will automatically:
- Read
ANTHROPIC_AUTH_TOKENfrom your environment variables - Authenticate through the ZenMux Anthropic-compatible endpoint
- Begin working immediately\u2014no additional login needed
- Read
If you encounter issues:
- The
claudecommand not found \u2192 Verify Claude Code is installed globally (see the installation steps above)
Step 5: Verify the Connection
After launching successfully, run /status in Claude Code to verify the connection. The output should display:
Auth token: ANTHROPIC_AUTH_TOKEN
Anthropic base URL: https://zenmux.ai/api/anthropic
What to check:
Auth tokendisplaysANTHROPIC_AUTH_TOKEN(loaded from environment variables)Anthropic base URLdisplayshttps://zenmux.ai/api/anthropic(the ZenMux endpoint)
If the configuration is correct, your setup is complete—start leveraging Ring 1T’s reasoning capabilities in Claude Code.
Using Claude Code: CLI vs VSCode Extension
You can use Claude Code in two ways. Choose based on your preferences:
CLI (Command-Line) - Recommended
When to use: You prefer command-line tools, want automatic environment variable loading, or need to work across multiple projects.
The CLI automatically loads environment variables from your shell profile (Steps 1-5 above):
cd /path/to/your/project
claude
Advantages:
- Environment variables load automatically from shell profile
- No additional configuration needed in VSCode
- Works consistently across all projects in that shell
- Lightweight and straightforward
VSCode Extension
When to use: You prefer an integrated development environment, want settings isolated to VSCode, or use VSCode as your primary editor.
Configure Claude Code directly in VSCode settings:
Step 1: Install the Extension
Search for “Claude Code” in the VSCode Extensions marketplace and install it. Once installed, the Claude Code icon will appear in your sidebar.
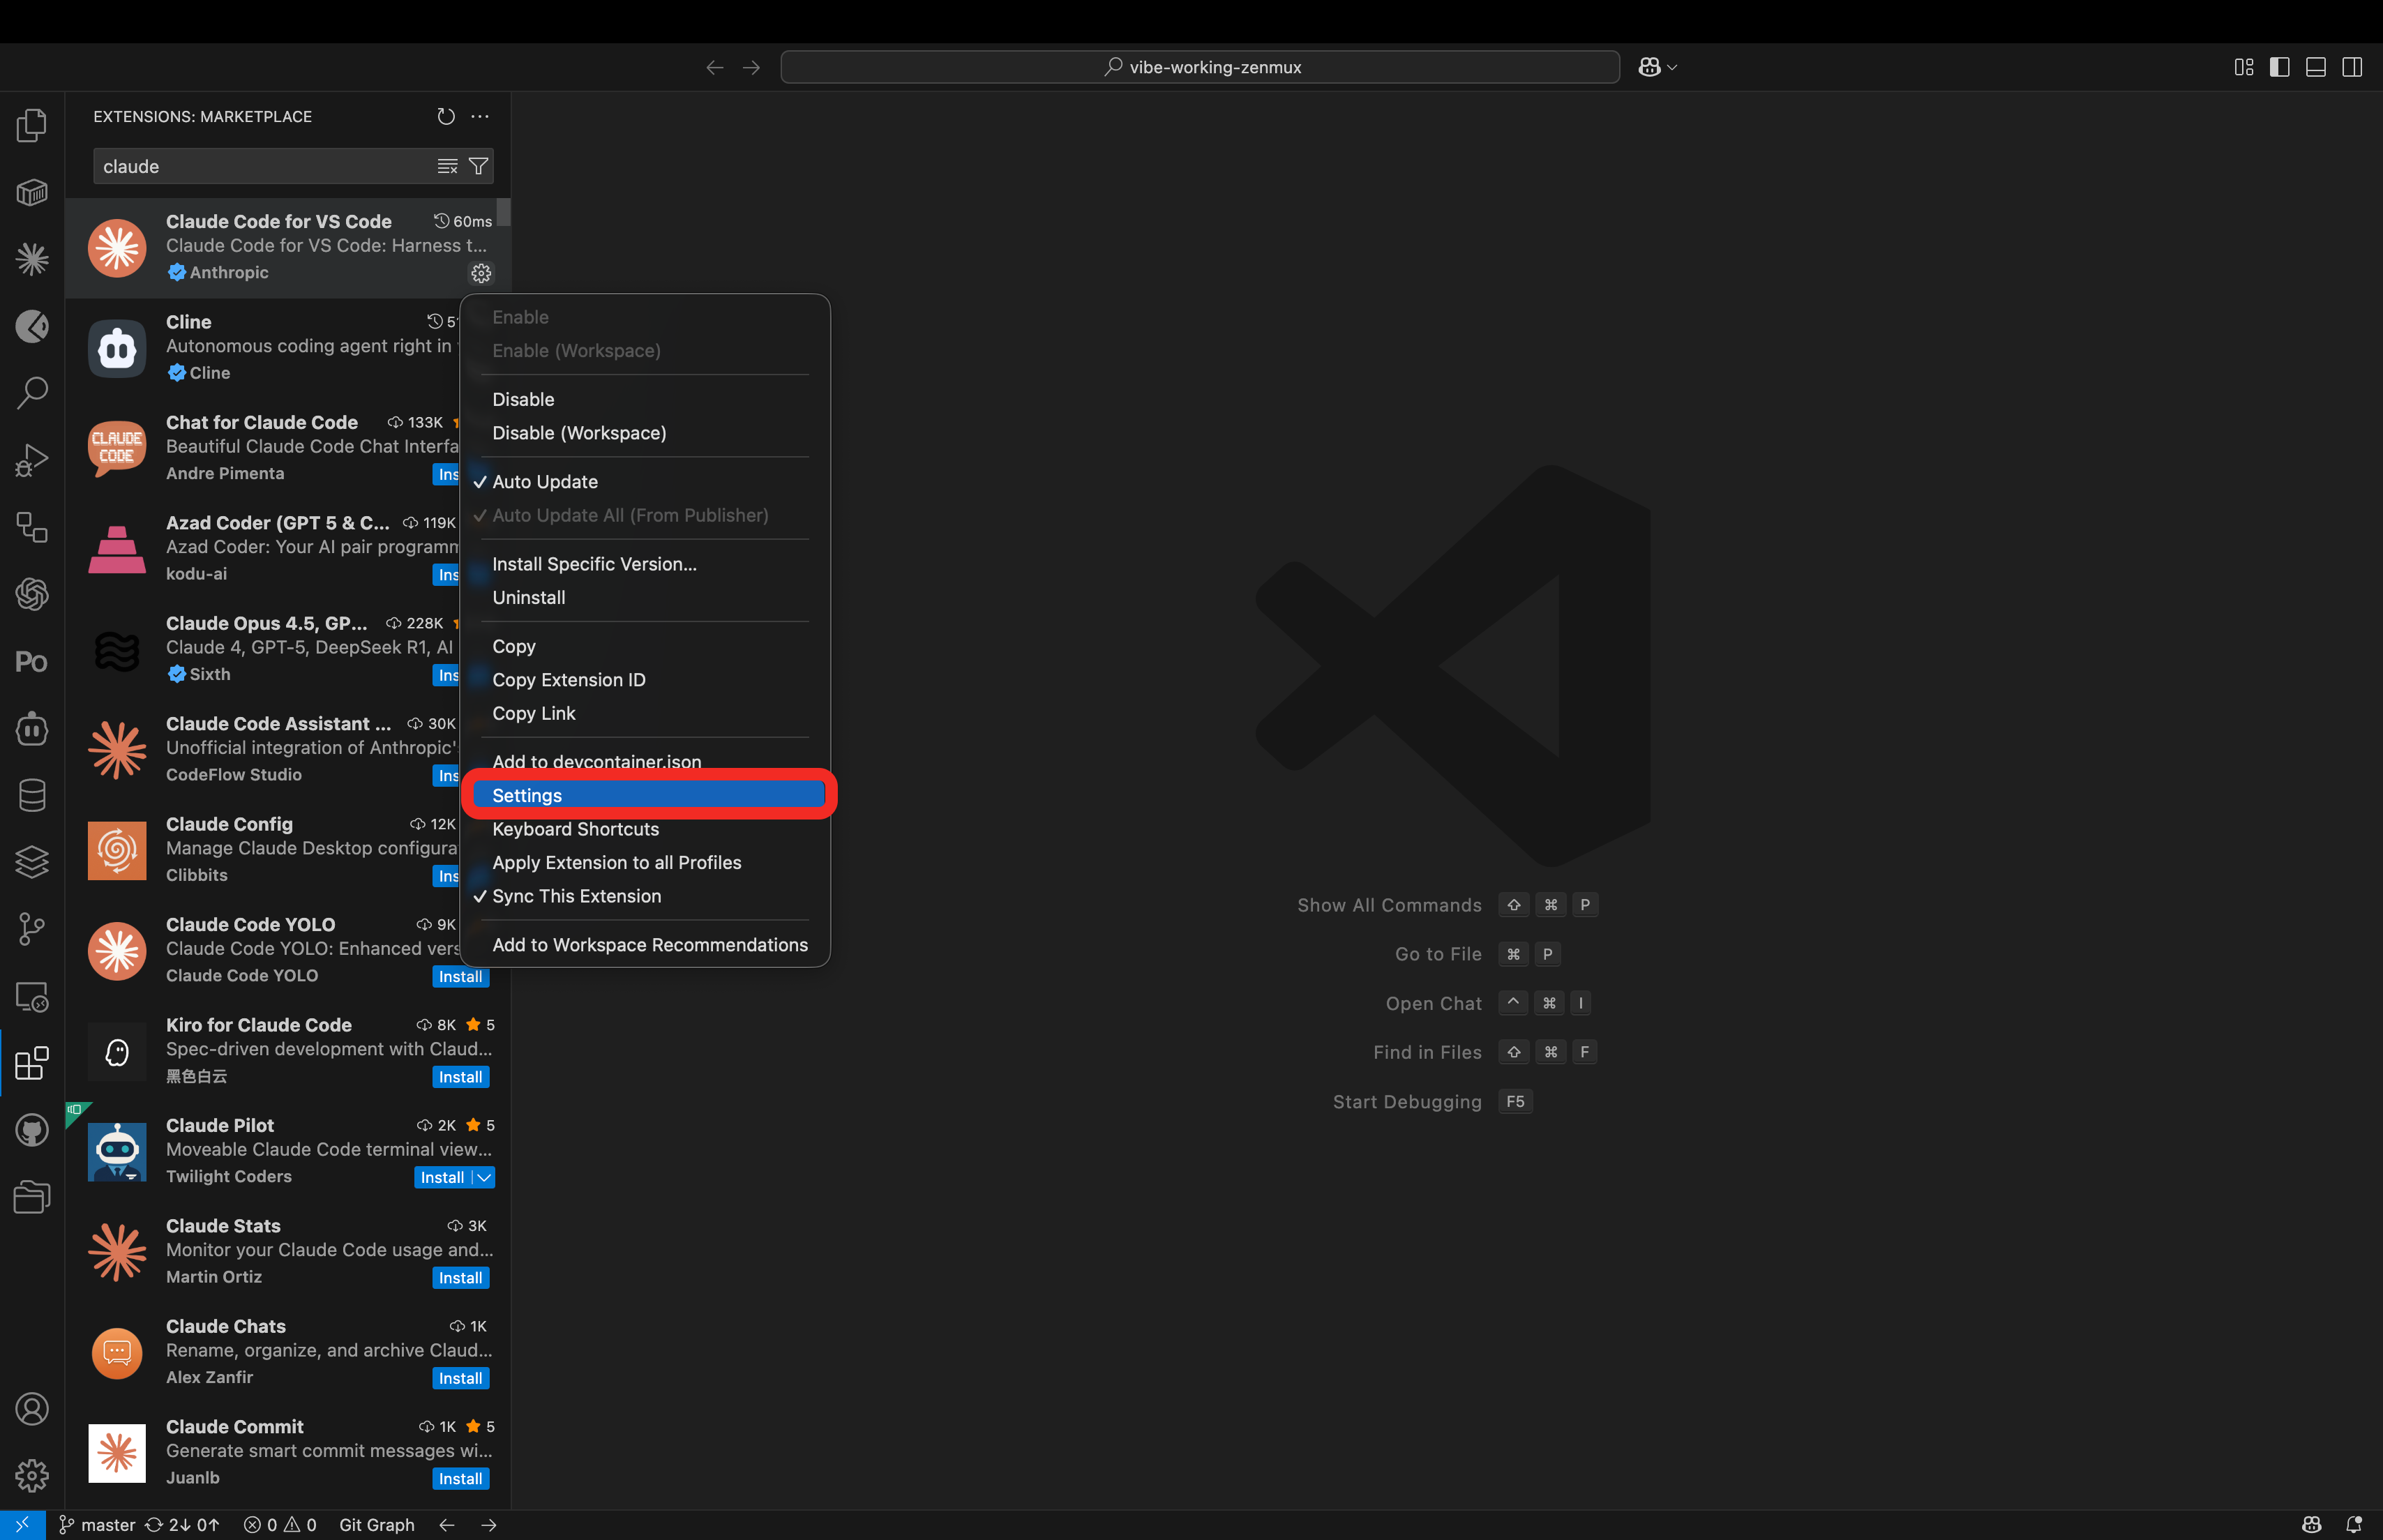
Step 2: Open Settings
Click the extension’s Settings icon to open the configuration page:
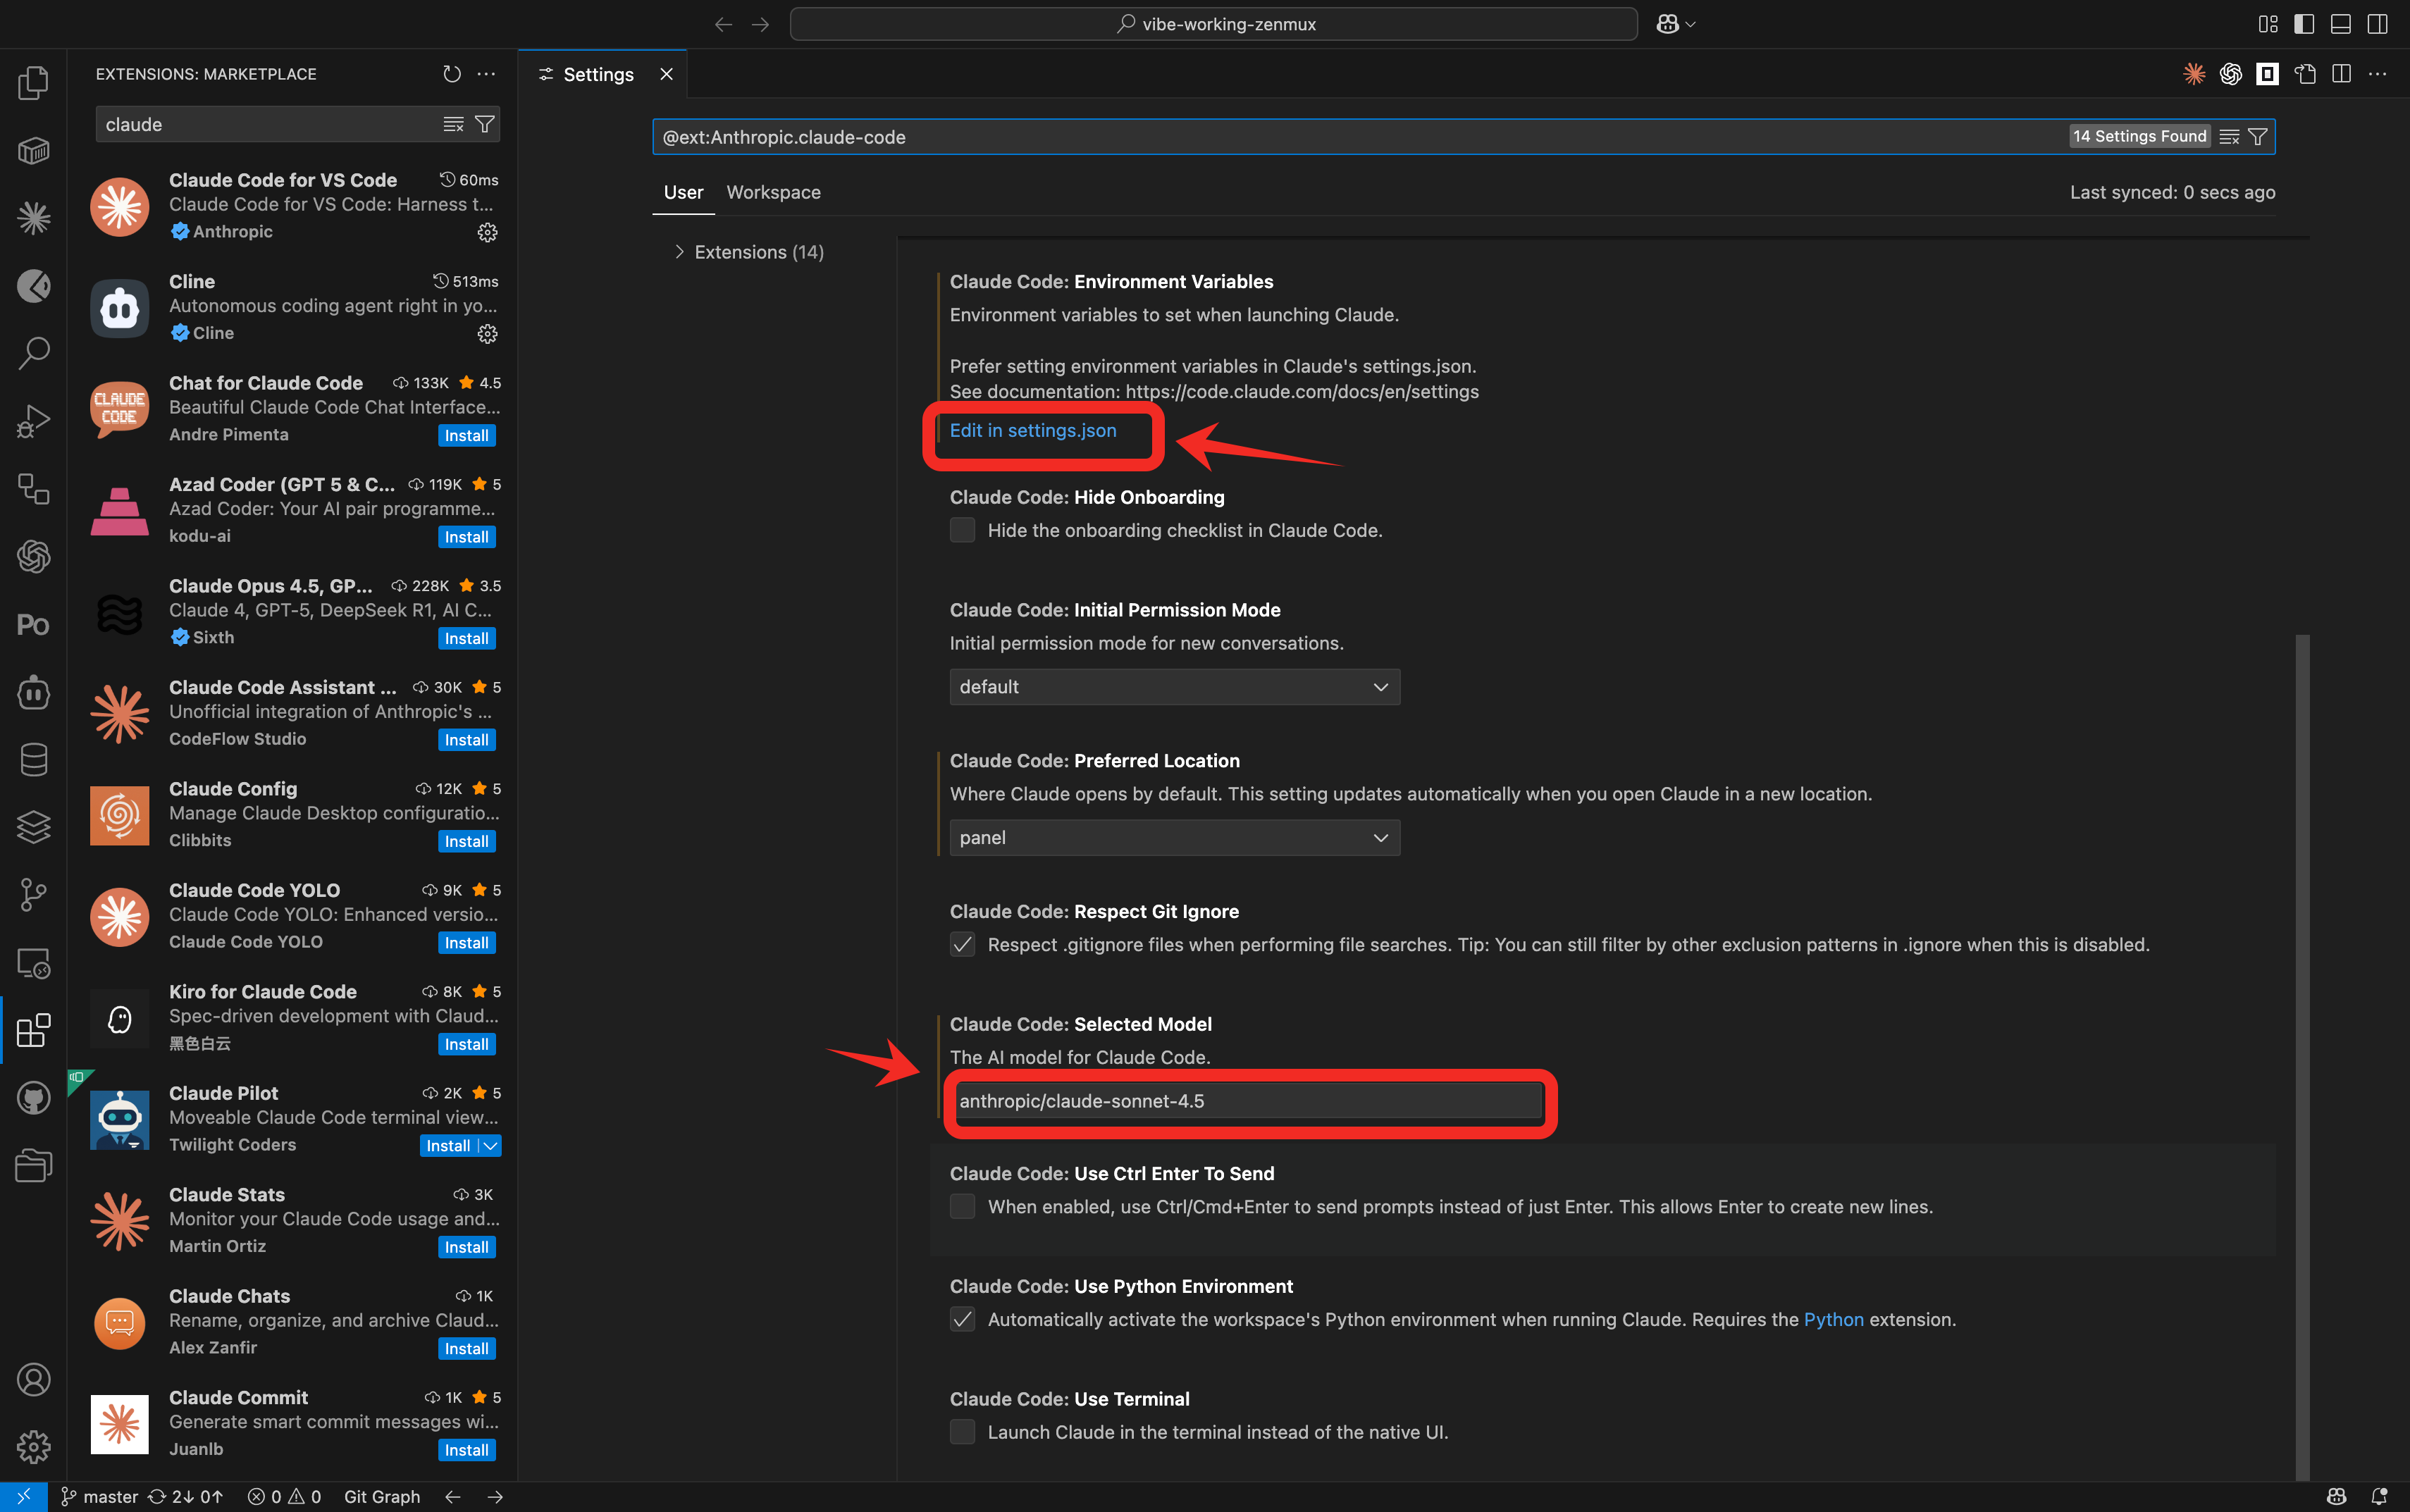
Step 3: Configure the Model and Environment Variables
Click Edit in settings.json and add or modify the following configuration:
{
  "claude-code.selectedModel": "inclusionai/ring-1t",
  "claudeCode.environmentVariables": [
    {
      "name": "ANTHROPIC_BASE_URL",
      "value": "https://zenmux.ai/api/anthropic"
    },
    {
      "name": "ANTHROPIC_AUTH_TOKEN",
      "value": "sk-ss-v1-xxx"
    },
    {
      "name": "API_TIMEOUT_MS",
      "value": "3000000"
    },
    {
      "name": "CLAUDE_CODE_DISABLE_NONESSENTIAL_TRAFFIC",
      "value": "1"
    },
    {
      "name": "ANTHROPIC_DEFAULT_HAIKU_MODEL",
      "value": "inclusionai/ring-1t"
    },
    {
      "name": "ANTHROPIC_DEFAULT_SONNET_MODEL",
      "value": "inclusionai/ring-1t"
    },
    {
      "name": "ANTHROPIC_DEFAULT_OPUS_MODEL",
      "value": "inclusionai/ring-1t"
    }
  ]
}
Important Configuration Notes:
-
Replace the API Key: Replace
sk-ss-v1-xxxwith your real ZenMux API Key- Subscription API Key (
sk-ss-v1-xxx): best for personal development - Pay-as-you-go API Key (
sk-ai-v1-xxx): best for production
- Subscription API Key (
-
Configuration priority:
- If you previously configured shell environment variables in the CLI (
~/.bashrc/~/.zshrc/ PowerShell Profile), the VSCode extension will prefer thesettings.jsonconfiguration - To avoid conflicts, when using the VSCode extension, configure environment variables only in
settings.json
- If you previously configured shell environment variables in the CLI (
-
Model selection:
claude-code.selectedModelsets Ring 1T as the active modelANTHROPIC_DEFAULT_*_MODELconfigures Ring 1T across all speed tiers- Use
/modelcommand during sessions to verify or switch models
Step 4: Start Using It
After configuration, you can start using the Claude Code extension:
- Click the Claude Code icon in the VSCode sidebar
- On first use, click Trust This Folder to grant access to your project files
- Start a conversation by entering your question or task
- Claude will automatically read and analyze your project files to help you
Useful Commands
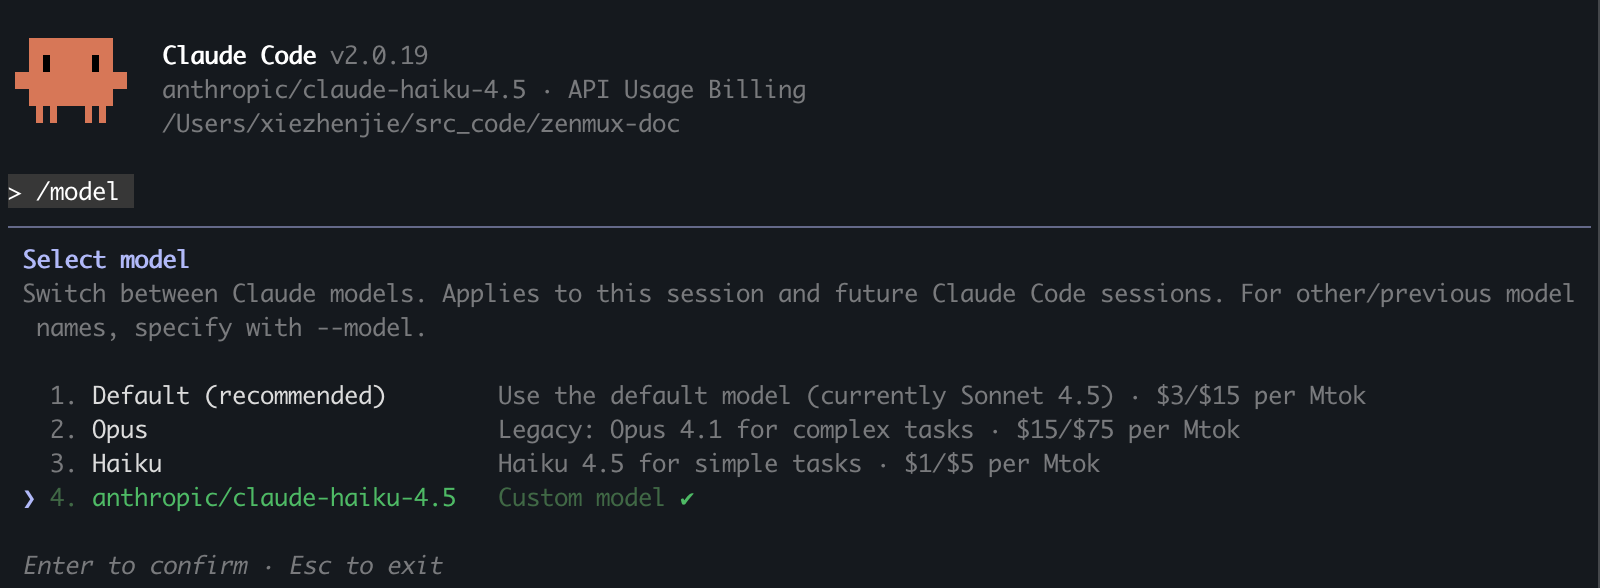
/model— View the current model or switch to another/status— Check connection status and verify the configuration is correct/help— Display all available commands
Note: If you encounter authentication issues in VSCode, ensure that
ANTHROPIC_AUTH_TOKENandANTHROPIC_BASE_URLare only configured insettings.jsonto avoid conflicts with system environment variables.
What It Looks Like
Once set up, Ring 1T is ready to use in Claude Code:

Use the /model command to confirm Ring 1T is active:
Next Steps & Useful Commands
Now that you have Ring 1T configured with Claude Code, here are some ways to get started:
Recommended First Tasks:
- Ask Claude Code to explain or refactor existing code in your project
- Request help with complex algorithms or system design problems
- Use Ring 1T’s reasoning capabilities for debugging difficult issues
Useful Commands in Claude Code:
/model— View the current model or switch to another/status— Check connection status and verify the configuration/help— Display all available commands/pwd— Show current working directory/clear— Clear conversation history
Explore More Models:
- Browse all available models on ZenMux’s model list
- Switch models using
/modelcommand during your session - Compare Ring 1T with other reasoning models for different use cases
Learn More:
- Read Claude Code documentation for advanced features
- Check ZenMux documentation for platform details
- See the Ring 1T model page for model specifics
Troubleshooting
Common Issues
API Key Error or Authentication Failure
Issue: You see messages like “invalid API key,” “unauthorized,” or authentication failed.
Solution:
-
Check the API Key format:
- Subscription API keys should start with
sk-ss-v1- - Pay-as-you-go API keys should start with
sk-ai-v1- - Ensure there are no extra spaces or newline characters
- Subscription API keys should start with
-
Validate the API Key:
- Subscription: visit the subscription management page to check subscription status and quota
- Pay-as-you-go: visit the pay-as-you-go page to confirm sufficient balance
-
Confirm environment variables are loaded:
# macOS/Linux
echo $ANTHROPIC_AUTH_TOKEN

# Windows PowerShell
echo $env:ANTHROPIC_AUTH_TOKEN
If the output is empty, the environment variables were not loaded correctly. Re-run
source ~/.zshrcor restart the terminal. -
Check the API Key status:
- Confirm the API key is shown as “Enabled” in the console
- Check whether the API key has been deleted or disabled
-
Get a new API Key:
Authentication Failure When Switching from Another Platform to ZenMux
Issue: You previously used a Claude Code official account or another platform (e.g., MiniMax, GLM, etc.). After switching to ZenMux, authentication fails or configuration conflicts occur.
Solution:
This usually happens because old config files cached prior authentication info, causing conflicts with the new ZenMux configuration. Clean up and reconfigure as follows:
-
Delete the old config file:
# Delete Claude Code config
rm -rf ~/.claude/settings.json
# Delete Claude Code config Remove-Item -Path "$env:USERPROFILE\.claude\settings.json" -Force -
Confirm your shell environment variables are configured correctly:
Check whether your shell config file (
~/.zshrcor~/.bashrc) contains the full ZenMux configuration. Refer to the shell profile configuration instructions above, and ensure it includes these key variables:export ANTHROPIC_BASE_URL="https://zenmux.ai/api/anthropic" export ANTHROPIC_AUTH_TOKEN="sk-ss-v1-xxx" # Replace with your ZenMux API Key export CLAUDE_CODE_DISABLE_NONESSENTIAL_TRAFFIC="1" export API_TIMEOUT_MS="30000000" export ANTHROPIC_API_KEY="" # Clear to avoid conflicts export ANTHROPIC_DEFAULT_HAIKU_MODEL="inclusionai/ring-1t" export ANTHROPIC_DEFAULT_SONNET_MODEL="inclusionai/ring-1t" export ANTHROPIC_DEFAULT_OPUS_MODEL="inclusionai/ring-1t" -
Reload environment variables:
source ~/.zshrcsource ~/.bashrc. $PROFILE -
Verify environment variables are applied:
# Check ZenMux endpoint
echo $ANTHROPIC_BASE_URL
# Should output: https://zenmux.ai/api/anthropic

# Check whether the API Key is set
echo $ANTHROPIC_AUTH_TOKEN
# Should output your ZenMux API Key

# Confirm the old API Key is cleared
echo $ANTHROPIC_API_KEY
# Should output empty
# Check ZenMux endpoint Write-Host "ANTHROPIC_BASE_URL: $env:ANTHROPIC_BASE_URL" # Should output: https://zenmux.ai/api/anthropic # Check whether the API Key is set Write-Host "ANTHROPIC_AUTH_TOKEN: $env:ANTHROPIC_AUTH_TOKEN" # Should output your ZenMux API Key # Confirm the old API Key is cleared Write-Host "ANTHROPIC_API_KEY: $env:ANTHROPIC_API_KEY" # Should output empty -
Restart Claude Code:
# Enter your project directory cd /path/to/your/project # Start Claude Code claude -
Verify the connection:
After starting, run
/statusin Claude Code and confirm it shows:Auth token: ANTHROPIC_AUTH_TOKEN Anthropic base URL: https://zenmux.ai/api/anthropic
The Model Does Not Support the Anthropic Protocol
Issue: When using a model, you see a message saying it does not support the Anthropic protocol.
Solution:
- Use the ZenMux model list and filter by “Anthropic Compatible API” to see currently supported models
- Or open the model’s detail page to confirm Anthropic protocol support
- Choose a model from the supported list above
Connection Failures
Issue: Claude Code cannot connect to the ZenMux service.
Solution:
- Check that your network connection is working
- Verify
ANTHROPIC_BASE_URLis set tohttps://zenmux.ai/api/anthropic - Confirm your firewall is not blocking outbound connections
VSCode Claude Code Extension Configuration Issues
Issue: In the VSCode Claude Code extension, you encounter issues such as authentication failures or models not working.
Solution:
-
Confirm the environment variables are configured correctly:
- Open VSCode Settings (
Cmd/Ctrl + ,) - Search for “Claude Code”
- Click “Edit in settings.json”
- Confirm
claudeCode.environmentVariablesincludes correctANTHROPIC_BASE_URLandANTHROPIC_AUTH_TOKEN
- Open VSCode Settings (
-
Check the model configuration:
- Search for “claude-code.selectedModel” in Settings
- Confirm it’s set to
inclusionai/ring-1t - Verify the model name format is correct
-
Resolve environment variable conflicts:
- The VSCode extension’s
settings.jsonconfiguration has higher priority than system environment variables - If you previously set environment variables in your shell profile, it’s recommended to keep only one source of configuration
- Avoid setting
ANTHROPIC_AUTH_TOKENin multiple places, which can cause conflicts
- The VSCode extension’s
-
Restart VSCode:
- After changing configuration, fully quit and relaunch VSCode
- Reopen the project so the new configuration takes effect
-
Check extension logs:
- Open the Output panel in VSCode (
View > Output) - Select the “Claude Code” channel
- Review detailed error messages to help diagnose the issue
- Open the Output panel in VSCode (
-
Verify the connection:
- In the Claude Code chat UI, type
/status - Confirm the displayed API endpoint and authentication method are correct
- In the Claude Code chat UI, type
For detailed configuration steps, see the Use the Claude Code Extension in VSCode section above.
Windows PowerShell Script Execution Policy Issue
Issue: PowerShell shows: “Cannot load file xxx because running scripts is disabled on this system.”
Solution:
This is a Windows PowerShell security mechanism. You need to change the execution policy:
-
Run PowerShell as Administrator
-
Execute:
Set-ExecutionPolicy -ExecutionPolicy RemoteSigned -Scope CurrentUser -
Type
Yto confirm -
Reopen the PowerShell window
Execution policy reference:
Restricted(default): no scripts can runRemoteSigned: local scripts can run; downloaded scripts require a digital signatureUnrestricted: all scripts can run (not recommended)
Windows: claude Command Not Found
Issue: After installing Claude Code, PowerShell cannot find the claude command.
Solution:
This is usually caused by the npm global package path not being added to the PATH environment variable.
-
Check the npm global prefix:
npm config get prefix -
Check whether that path is in PATH:
$env:PATH -split ";" | Select-String "npm" -
If it isn’t, add it manually (choose one):
Option 1: Temporary (current session only)
$env:PATH += ";C:\Users\<YourUsername>\AppData\Roaming\npm"Option 2: Permanent (recommended)
[Environment]::SetEnvironmentVariable( "Path", [Environment]::GetEnvironmentVariable("Path", "User") + ";C:\Users\<YourUsername>\AppData\Roaming\npm", "User" ) -
Close and reopen PowerShell
-
Verify the installation:
claude --version
Windows PowerShell Profile Not Taking Effect
Issue: You configured the PowerShell Profile, but the environment variables are not loaded.
Solution:
-
Confirm the Profile file path is correct:
$PROFILE # Should show something like: C:\Users\<YourUsername>\Documents\PowerShell\Microsoft.PowerShell_profile.ps1 -
Confirm the Profile file exists:
Test-Path $PROFILE # Should return True -
Confirm the Profile file content is correct:
Get-Content $PROFILE -
Manually load the Profile (to test for syntax errors):
. $PROFILE -
If errors occur, check:
- Whether the file encoding is UTF-8
- Whether the PowerShell syntax is correct (note the
$env:prefix) - Whether the execution policy allows scripts (see “PowerShell Script Execution Policy Issue” above)
-
Verify environment variables are loaded:
Write-Host "ANTHROPIC_BASE_URL: $env:ANTHROPIC_BASE_URL"
Write-Host "ANTHROPIC_AUTH_TOKEN: $env:ANTHROPIC_AUTH_TOKEN"
Windows: Chinese Characters in Environment Variables
Issue: Garbled text appears when environment variables contain Chinese paths or values.
Solution:
-
Ensure the PowerShell Profile file uses UTF-8 with BOM encoding
-
Set the correct encoding in PowerShell:
[Console]::OutputEncoding = [System.Text.Encoding]::UTF8
More Models
See the ZenMux model list for all available models and detailed information.
Contact Us
If you encounter issues, need help, or have feedback, reach out through:
- GitHub Discussions: Submit issues and discuss in our community forum
- Email: Support channels available on zenmux.ai
- Documentation: Browse the ZenMux docs for additional guides and references